Make-Ahead Strawberry Syrup: Enjoy Fresh Milk for Weeks
Imagine a tall, ice-cold glass of strawberry milk, bursting with the authentic flavor of ripe berries, a delicate blush of natural pink, and absolutely no artificial ingredients. If your family loves the sweet comfort of strawberry milk but you're wary of the bottled, artificially colored syrups, then you're in for a treat. This comprehensive guide will walk you through creating your very own make-ahead strawberry syrup – a game-changer that allows you to whip up a delicious glass of Easy Homemade Strawberry Milk: Fresh Taste, No Artificials at a moment's notice, keeping your fridge stocked with pure goodness for weeks.
The beauty of this homemade strawberry milk recipe lies in its simplicity and the superior taste it delivers. Forget the neon pink and sugary artificial flavors; we're talking about a syrup made from real strawberries, a natural sweetener, and nothing else. It's not just a recipe; it's an upgrade to your daily milk routine, ensuring you and your loved ones enjoy fresh, wholesome flavor without compromise.
Why Choose Homemade Strawberry Syrup Over Store-Bought?
The allure of a vibrant pink bottle of strawberry syrup from the grocery store is undeniable for many, especially children. However, a quick glance at the ingredient list often reveals a concoction of high-fructose corn syrup, artificial colors, and synthetic flavors. Our homemade strawberry milk recipe offers a vastly superior alternative, focusing on health, taste, and versatility.
- Unrivaled Fresh Flavor: Nothing compares to the taste of real strawberries. This syrup captures the fruit's natural sweetness and subtle tartness, delivering an authentic flavor profile that artificial syrups can't replicate.
- No Artificial Additives: Say goodbye to artificial colors like Red #40 and mystery "natural flavors." Our syrup gets its beautiful light pink hue and incredible taste solely from fresh strawberries. This makes it an ideal choice for families looking to reduce their intake of processed ingredients.
- Controlled Sweetness: You're in charge! By making it yourself, you can adjust the amount and type of sweetener to suit your family's preferences, opting for maple syrup, honey, or even regular sugar. This level of control is impossible with pre-made syrups.
- Versatility Beyond Milk: While perfect for making Ingredient Strawberry Milk: Better Than Store-Bought Pink Syrup, this homemade syrup is incredibly versatile. Drizzle it over pancakes, waffles, yogurt, ice cream, or stir it into sparkling water for a refreshing spritzer.
- Economical & Sustainable: Making syrup at home can be more cost-effective, especially when strawberries are in season. It also reduces packaging waste compared to buying multiple bottles of commercial syrup.
The biggest advantage, however, is the convenience it offers. By preparing a batch of syrup, you unlock weeks of instant strawberry milk enjoyment. The syrup itself stores beautifully, meaning you're always just a stir away from a delightful, healthy treat.
The Simple Magic: Ingredients & Equipment You'll Need
One of the most appealing aspects of this homemade strawberry milk recipe is its short and sweet ingredient list. You only need three core items, plus your choice of milk, to create this delicious syrup.
Essential Ingredients:
- Fresh Strawberries: The star of the show! Opt for ripe, vibrant red strawberries for the best flavor. While the recipe primarily uses fresh, a pro tip: frozen strawberries (thawed) can also be used, making this a year-round possibility. Rinse them thoroughly and pat dry to avoid excess water affecting the syrup's consistency.
- Maple Syrup: This is our preferred sweetener, offering a lovely depth of flavor that complements strawberries beautifully. However, you can easily substitute with honey (not recommended for infants under one year old) or granulated white sugar if you prefer a more neutral sweetness or different flavor profile. Adjust the amount to your taste; you can always add more to the final drink.
- Milk of Choice: This syrup is incredibly adaptable. It pairs perfectly with traditional dairy milk (whole, 2%, skim) as well as a variety of non-dairy alternatives. Almond milk, soy milk, oat milk, and even cashew milk work wonderfully. The key is to ensure your chosen non-dairy milk is plain and unsweetened, allowing the strawberry flavor to truly shine.
Helpful Equipment:
- Medium Saucepan: For cooking down the strawberries.
- Blender or Immersion Blender: To achieve a smooth syrup consistency.
- Fine-Mesh Colander or Sieve: Crucial for straining out the strawberry seeds if you prefer a silky-smooth syrup without flecks.
- Airtight Jar or Bottle: For storing your finished syrup in the refrigerator.
- Clean Kitchen Towel: For patting dry your washed strawberries.
Crafting Your Make-Ahead Strawberry Syrup: A Step-by-Step Guide
Making this syrup is surprisingly straightforward and incredibly rewarding. Follow these steps to create a batch of delightful strawberry goodness that will elevate your milk for weeks.
Step 1: Prepare Your Strawberries
Begin by rinsing about 1 pound of fresh strawberries under cold water. Gently pat them completely dry with a clean kitchen towel. Hull the strawberries (remove the green leafy tops) and then dice them into small, roughly uniform pieces. Smaller pieces will cook down faster and more evenly.
Step 2: Cook the Berries
Transfer your diced strawberries to a medium saucepan. Place the saucepan over medium heat. Allow the strawberries to cook, stirring occasionally, until they begin to soften and break down, releasing their juices. This usually takes about 5-7 minutes. You'll notice them becoming jammy and fragrant.
Step 3: Sweeten and Simmer
Once the strawberries have softened, stir in approximately ½ cup of your chosen sweetener (maple syrup, honey, or sugar). Bring the mixture to a gentle simmer, then reduce the heat to low and continue to simmer for about 8 minutes. During this time, the strawberries will cook further into a delicious sauce, and the flavors will meld beautifully. Stir occasionally to prevent sticking.
Step 4: Cool and Blend
Remove the saucepan from the heat and allow the strawberry mixture to cool down significantly. This is important for safety and to ensure a better blend. Once cooled, transfer the sauce to a blender or use an immersion blender directly in the saucepan. Process until the mixture is completely smooth and uniform. This might take 1-2 minutes, depending on your blender.
Step 5: Strain for Silky Smoothness (Optional, but Recommended!)
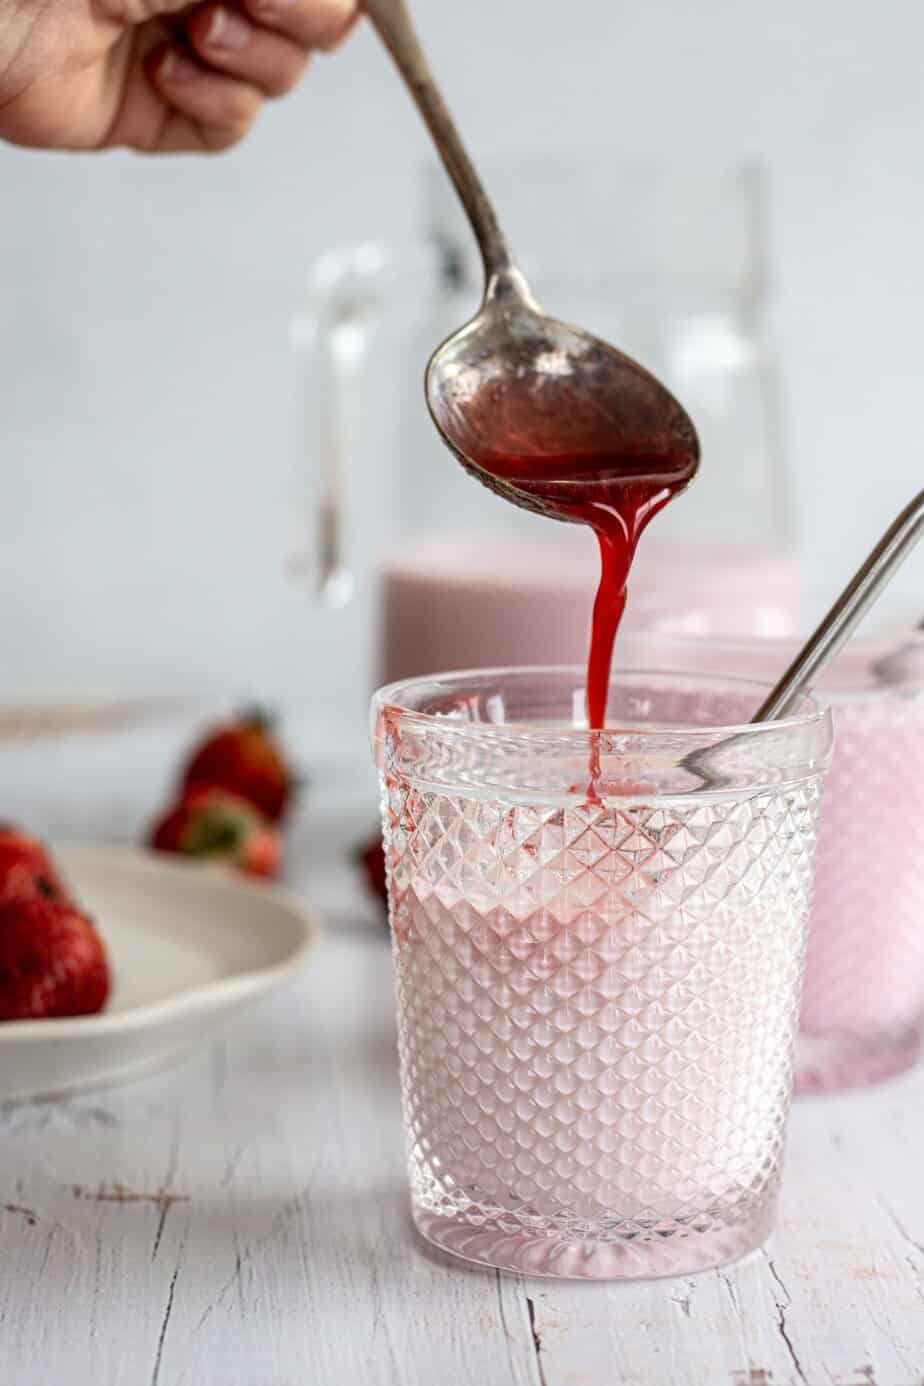
For that ultra-smooth, seed-free strawberry milk experience, place a fine-mesh colander or sieve over a clean, airtight jar or bottle. Carefully pour the blended strawberry liquid through the sieve, using a spoon or spatula to press the pulp against the mesh to extract all the delicious liquid. This step effectively separates any tiny strawberry seeds, leaving you with a wonderfully silky syrup. If you don't mind the seeds, you can skip this step.
Step 6: Store Your Syrup
Once strained, seal the jar or bottle tightly with a lid. Your homemade strawberry syrup is now ready for storage! Refrigerate it immediately. This make-ahead syrup will stay fresh and delicious in the fridge for up to 2-3 weeks, providing you with an instant fix for your strawberry milk cravings whenever they strike.
Enjoying Your Homemade Strawberry Milk & Beyond
The best part about having this homemade strawberry syrup on hand is the instant gratification it offers. Making a glass of strawberry milk couldn't be simpler!
Making the Perfect Glass of Strawberry Milk:
For a standard 8-ounce (1 cup) serving of milk, add 1 to 2 tablespoons of your freshly made strawberry syrup. Adjust the amount to your personal sweetness preference. Stir thoroughly until the syrup is fully dissolved. Add ice if desired, and enjoy your refreshingly natural drink! Remember not to pre-mix large batches of strawberry milk, as the natural acidity of the berries can cause dairy milk to spoil faster. Always mix just before serving.
Creative Uses for Your Strawberry Syrup:
Don't limit this glorious syrup to just milk! Its vibrant flavor and beautiful color make it a fantastic addition to numerous culinary creations:
- Breakfast Booster: Drizzle generously over pancakes, waffles, French toast, oatmeal, or even a bowl of plain yogurt.
- Dessert Delight: Spoon it over ice cream, cheesecake, or fresh fruit salad for an instant gourmet touch.
- Refreshing Drinks: Mix a few tablespoons with sparkling water for a homemade strawberry soda, or add it to iced tea or lemonade for a fruity twist. It also makes a fantastic base for cocktails or mocktails.
- Baking Brilliance: Incorporate it into glazes for cakes, swirl it into muffin batter, or use it to flavor frostings.
Tips for Success & Longevity:
- Seasonality Matters: While frozen strawberries work, using fresh, in-season strawberries will always yield the most vibrant flavor.
- Sweetness Adjustment: Taste your cooked strawberry mixture before blending. If you prefer it sweeter, you can add a little more sweetener at that stage.
- Color Expectation: Your homemade strawberry milk will have a delicate, light pink hue, not the bright, almost neon pink of store-bought versions. This is a sign of its natural, artificial-free goodness!
- Proper Storage: Always store the syrup in a clean, airtight container in the refrigerator to maintain its freshness and prevent spoilage.
Conclusion
Transforming your ordinary milk into an extraordinary treat is easier than you think with this homemade strawberry milk recipe. By investing a little time upfront to create a batch of make-ahead strawberry syrup, you unlock weeks of delicious, natural flavor that’s far superior to anything you’ll find in a bottle. You're not just making a drink; you're making a healthier choice, reducing artificial ingredients, and bringing the fresh taste of summer into your home, ready to enjoy at any moment. So, grab some fresh strawberries, get cooking, and prepare to elevate your milk-drinking experience to a whole new level!
